Installing an Android car multimedia system? Start here. Proper wiring is critical – not just for performance but for safety. Poor connections can cause malfunctions, fires, or costly repairs. Here’s a quick breakdown of what you need to know:
- Tools You’ll Need: Wire strippers, crimping tools, heat-shrink tubing, digital multimeter, and more.
- Preparation: Disconnect the battery, review wiring diagrams, inspect your vehicle’s electrical system, and check fuse box capacity.
- Wiring Tips: Use pre-assembled harnesses to avoid cutting factory wires, match wire colors carefully, and avoid common mistakes like reversed polarity or loose connections.
- Connection Methods: Soldering with heat-shrink tubing is the most reliable; crimp connectors are also solid.
- Testing: Confirm all connections with voltage tests, check system functions (audio, cameras, etc.), and validate safety features like fuses and ground connections.
Follow these steps for a safer, more reliable installation. Now, let’s dive into the details.
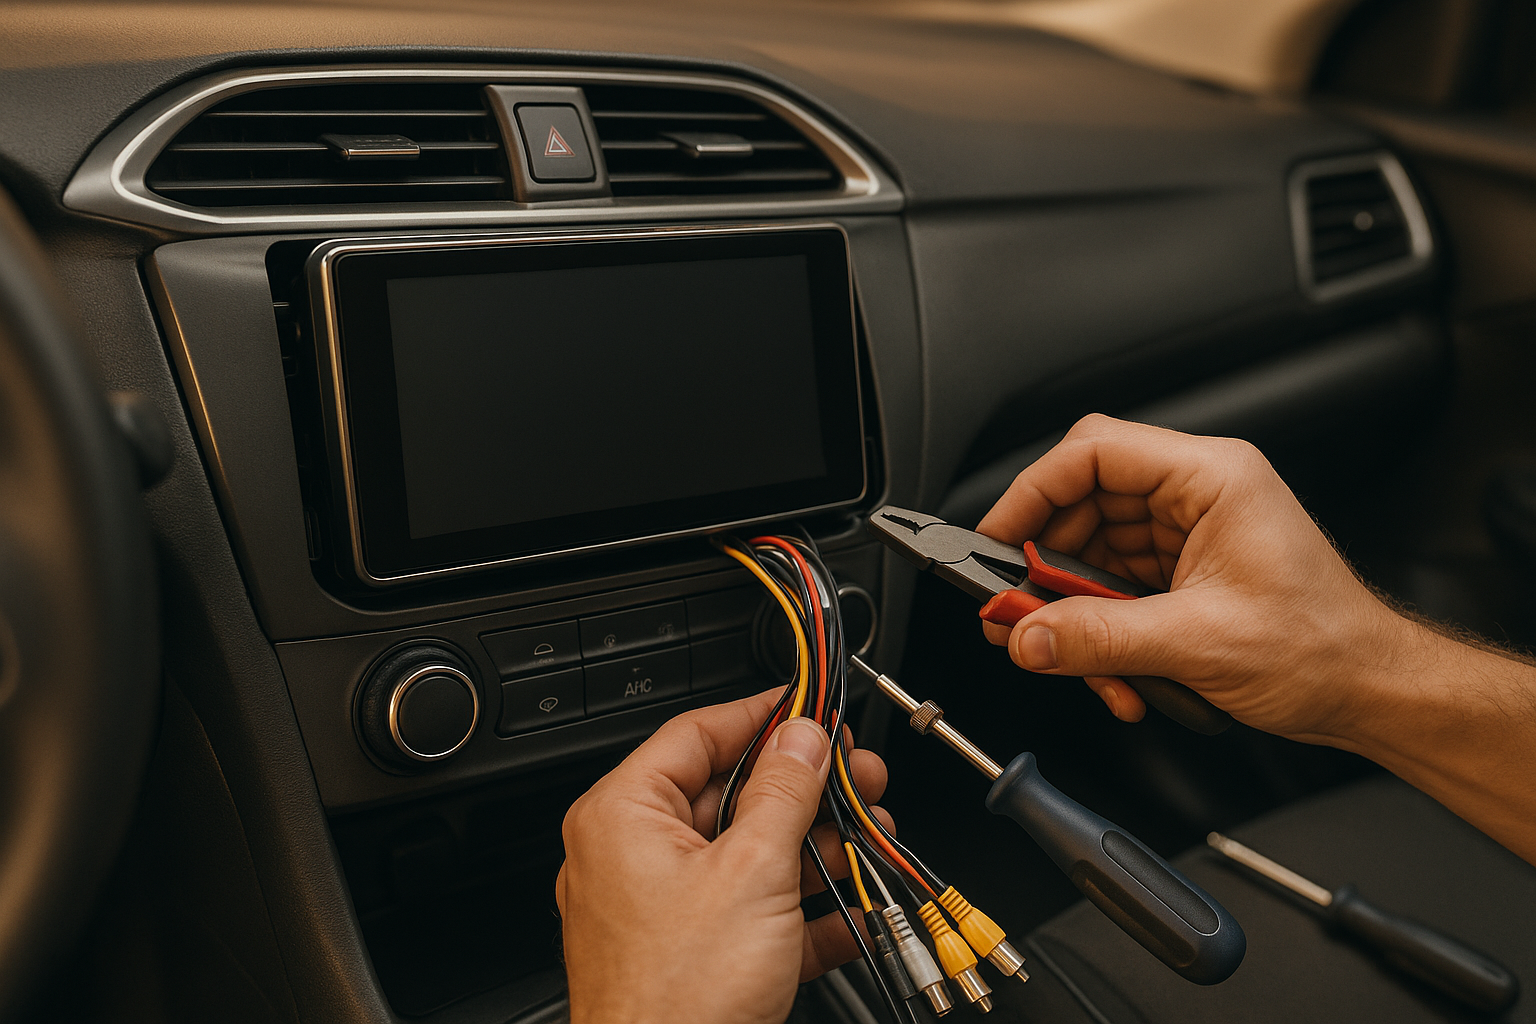
Why You Shouldn’t Use Wire Nuts On A Car
Preparation and Safety Steps
Getting everything ready before installation is key to avoiding mistakes, protecting your vehicle, and ensuring a smooth process. Having the right tools and performing essential checks beforehand can save you time and frustration.
Required Tools and Equipment
Using the proper tools makes all the difference in achieving a reliable and professional installation. Here’s what you’ll need:
- Wire strippers: These are crucial for removing insulation cleanly without damaging the wires underneath. Opt for adjustable models that work with wire gauges from 10 to 22 AWG, as these cover most automotive wiring needs.
- Crimping tools: A ratcheting crimper ensures secure and consistent connections between wires and terminals. Avoid using pliers – they don’t provide the consistent pressure needed for durable connections.
- Heat-shrink tubing: This adds a waterproof seal and strain relief to your connections. Keep a variety of sizes on hand, from 1/8 inch to 1/2 inch, to suit different wire bundles.
- Digital multimeter: Use this to measure voltage, continuity, and resistance during the installation process.
- Electrical tape: Vinyl-based tape offers extra insulation and holds up well in extreme temperatures and moisture.
- Additional items: Zip ties for organizing wires, dielectric grease to protect connections from corrosion, wire nuts for quick fixes, a test light for voltage checks, and fuse pullers for safely handling fuses.
Once your tools are ready, you can move on to pre-installation checks to ensure your vehicle is prepped for the new system.
Pre-Installation Checks
Before diving into the installation, it’s crucial to run a series of checks to protect your vehicle and ensure everything works as it should.
- Disconnect the battery: Always start by disconnecting the battery – negative terminal first, then positive. Wait about 10 minutes to let any residual charge dissipate.
- Review wiring diagrams: Compare the wiring diagram for the YeeElek system with your vehicle’s factory wiring. This helps avoid connection mistakes. Resources like AllData or Mitchell can provide detailed vehicle-specific wiring information if needed.
- Check the electrical system: With the engine running, measure the charging system voltage. It should read between 13.8 and 14.4 volts. If it’s lower, there might be an alternator issue that could impact your new system’s performance.
- Inspect existing wiring: Look for any damage, corrosion, or previous modifications. Pay attention to aftermarket equipment like alarm systems or remote starters that might share power or ground connections with your new system. Document these to avoid conflicts.
- Assess fuse box capacity: Android multimedia systems typically draw 10 to 15 amps during peak use. Make sure your fuse box has enough capacity or that you can safely add circuits without overloading the system.
- Test vehicle functions: Before installation, confirm that all existing systems – lights, HVAC controls, power windows, etc. – are working properly. This baseline makes it easier to spot issues that might come up later.
Finally, set up your workspace for efficiency and safety. Ensure proper lighting and ventilation, keep your tools organized, and remove any metal jewelry to avoid accidental short circuits. Having a fire extinguisher rated for electrical fires nearby is a smart precaution, and good ventilation will help disperse any smoke from soldering or heat-shrink work.
Wire Identification and Connection
Getting the wiring right is essential for both the safety and smooth operation of your YeeElek multimedia system. Below, we’ll walk through the best practices for using wiring harnesses, matching wire colors, and avoiding common mistakes that can cause headaches down the road.
Using Wiring Harnesses
Wiring harnesses make installing Android multimedia systems much easier. These pre-assembled connectors let you hook into your vehicle’s factory wiring without the need to cut or splice the original wires. This preserves your vehicle’s warranty and makes future repairs simpler. Many YeeElek systems come with vehicle-specific harnesses designed to fit standard connector types, taking the guesswork out of the process.
Harnesses are usually color-coded and use appropriate wire gauges (like 16 to 18 AWG) to handle the power demands of today’s systems. Another advantage? Troubleshooting is a breeze. Instead of dealing with spliced wires, you can simply unplug the harness to isolate the system.
Wire Color and Function Matching
Once you’ve connected the harness, matching the wire colors correctly is the next step. While colors can vary by manufacturer, these general guidelines are widely used:
- Power Wires: The constant 12V wire, typically yellow, keeps memory settings and the clock running even when the engine is off. A red wire usually represents switched 12V power, which only activates when the ignition or accessory mode is on – helping to prevent battery drain.
- Ground Connections: Black wires serve as the ground and should be securely connected to the vehicle’s chassis. To confirm a solid connection, check resistance between the ground wire and a reliable chassis ground.
- Speaker Wires: Follow the wiring diagram to ensure correct speaker polarity. Incorrect connections can cause phase issues, which may reduce sound quality.
- Accessory Wires: These handle features like steering wheel controls or camera triggers. Since accessory wire colors can differ, always consult the provided wiring diagram to ensure proper connections.
Common Wiring Mistakes to Avoid
Avoiding wiring mistakes will save you time and prevent potential damage. Here are some common pitfalls and how to steer clear of them:
- Reversed Polarity: Reversed polarity can damage circuits. Always double-check connections with a multimeter before powering up the system.
- Loose Connections: Vibration and temperature changes can loosen connections over time. Ensure all wires are fully seated in connectors or crimp terminals, and use proper insulation to keep them secure.
- Inadequate Wire Gauge: Using wires that are too thin can lead to voltage drops and poor system performance. Stick to wire gauges that meet or exceed the system’s requirements, and calculate voltage drop if necessary.
- Mixing Connection Methods: Combining methods like soldering and twist-and-tape creates weak spots in the circuit. Instead, stick to one method – soldering with heat-shrink tubing is a reliable choice for durable connections.
- Ignoring Load Requirements: Modern multimedia systems can draw a lot of power. Verify that accessory circuits, wiring, and fuses can handle the load. If in doubt, run a dedicated power wire with an appropriately placed fuse.
- Temperature Effects: Extreme heat or cold can impact connectors and insulation. Use components like heat-shrink tubing rated for tough automotive conditions to ensure reliability, even in high-temperature areas like the dashboard.
sbb-itb-e12833d
Securing Connections and Short Circuit Prevention
After matching your wires correctly, the next step is ensuring those connections are solid and secure. Weak connections are a leading cause of multimedia system failures, and short circuits can cause serious damage to both your YeeElek system and your vehicle’s electrical setup. This section focuses on reliable connection techniques and insulation methods to keep your system running smoothly.
Connection Methods Comparison
Different connection methods offer varying levels of reliability and safety. Choosing the right approach can make your installation more durable and long-lasting.
Soldering with heat-shrink tubing is the gold standard for automotive connections. The solder forms a strong electrical bond that resists loosening from vibrations, while the heat-shrink tubing protects against moisture and corrosion. This method is ideal for permanent setups where future changes are unlikely. Use 60/40 rosin-core solder for the best results, and let the joint cool completely before applying heat-shrink tubing.
Crimp connectors are another dependable option, provided you use high-quality connectors and the right crimping tool. Properly installed crimp connectors create a tight seal that resists corrosion and are easier to remove for troubleshooting. Look for connectors with built-in insulation and use a ratcheting crimper for a consistent, secure fit. Avoid cheap crimp tools, as they can lead to loose and unreliable connections.
Wire nuts and twist connections, while common in household wiring, are unsuitable for vehicles. The constant vibration and temperature changes in a car environment will eventually loosen these connections, leading to failures. Avoid using these methods for any automotive multimedia installations.
| Connection Method | Durability | Moisture Resistance | Ease of Removal | Best Use Case |
|---|---|---|---|---|
| Soldering + Heat-Shrink | Excellent | Excellent | Not removable | Permanent installations, high-vibration areas |
| Quality Crimp Connectors | Very Good | Good | Easy | Semi-permanent connections, troubleshooting |
| Wire Nuts/Twist | Poor | Poor | Easy | Not recommended for automotive use |
Electrical tape, while useful for temporary fixes, is not a reliable solution for securing connections. It doesn’t create a mechanical bond and its adhesive can degrade over time, leaving residue that attracts dirt and moisture.
Wire Insulation and Routing
Even with strong connections, proper insulation and careful wire routing are essential for long-term reliability. Automotive conditions can be harsh, and neglecting these steps can lead to failures down the road.
Heat-shrink tubing is the best choice for insulation. Opt for tubing with a 3:1 shrink ratio and adhesive lining for a watertight seal. Ensure the tubing extends at least 1/4 inch beyond the connection on both sides. For areas exposed to high heat, such as near the engine, use tubing rated for at least 200°F. Marine-grade tubing offers even better moisture resistance.
When routing wires, avoid sharp edges that could wear through insulation over time. Metal panels, especially around cutouts, often have sharp edges. Use rubber grommets when passing wires through metal holes, and secure wires with zip ties or wire loom to prevent movement and abrasion.
Keep power and signal wires separated to reduce interference. Ideally, run power cables along one side of the vehicle and signal cables along the other. If they must cross, do so at a 90-degree angle to minimize noise. This is especially important for audio and antenna signal wires, which are more sensitive to interference.
Temperature management is another key factor. Avoid routing wires near heat sources such as exhaust systems or radiators. Use automotive-grade wires designed to remain flexible in both extreme heat and cold. For example, dashboard areas can reach over 160°F in summer, so make sure your wires and insulation can handle those conditions.
Protect against moisture by sealing connections and choosing dry routing paths. Avoid low points where water might pool, and seal connections in areas prone to moisture, like door jambs or near the firewall. Applying dielectric grease to connections in these areas can add an extra layer of protection.
Strain relief is crucial for preventing wire movement from damaging connections. Secure wires within 6 inches of any connection point, and include service loops to allow movement without stressing the connection. This is especially important for wires attached to moving parts, such as seats or doors.
Investing time in proper connection methods and thoughtful wire routing ensures a reliable system. Skipping these steps often leads to frustrating and hard-to-diagnose issues later, which may force you to redo parts of your installation. Taking the time to do it right from the start saves you trouble down the line.
Testing and Installation Completion
Once all wiring is securely connected and properly insulated, the next step is to ensure everything works as intended. Thorough testing helps confirm that your YeeElek system is both safe and reliable. By following a systematic approach, you can catch potential issues early and verify compliance with safety standards.
System Function Tests
Start by testing the system with the vehicle’s ignition turned off, keeping all connections accessible for adjustments. Reconnect any temporarily disconnected battery terminals, and then switch the ignition to the accessory position. Check if the system powers on and displays its boot screen. If it doesn’t, double-check the constant power and ignition connections.
Next, test the audio output by isolating each speaker channel. Use the balance and fade controls on the system to test each speaker individually, playing a familiar audio track. Listen closely for any distortion, crackling, or inconsistencies – these could point to grounding problems or wiring errors.
For additional features, such as a backup camera, shift into reverse to ensure the display switches to the camera view without delay. Test steering wheel controls and USB ports to confirm they respond and function as expected. If your setup includes climate control integration, verify that the system accurately displays temperature readings and responds to climate inputs without interfering with the vehicle’s HVAC system. Running the system under normal conditions for an extended period can help identify intermittent issues.
Voltage and Continuity Testing
Using a digital multimeter, measure voltage at key connection points to ensure they remain within acceptable ranges while the system is active. Perform load tests by operating various system functions – such as audio playback, navigation, or device charging – while rechecking voltage levels. This ensures the wiring can handle the system’s current demands.
Check each wire for proper continuity and confirm there are no shorts. Inspect insulation between circuits to prevent accidental contact or short circuits. Monitor the system’s current draw to identify any unusual power consumption, which could indicate internal issues or wiring problems.
Safety Feature Validation
Once electrical testing is complete, validate the system’s safety features. For example, confirm that the parking brake signal and reverse camera activation work as intended. Ensure that components controlled by the ignition turn off when the vehicle is off, except for essential functions like memory retention or the clock, to avoid unnecessary battery drain.
Check that all fuses match the specified amperage ratings to protect the wiring from overloads. Verify that ground fault protection is effective and that the system shuts down safely during power interruptions.
Document all voltage readings, test results, and installation photos for future reference. A well-tested system not only ensures reliability but also reflects the care you’ve taken in completing a safe and professional installation.
Key Points and Best Practices Summary
When installing a car multimedia system, following safe wiring practices is essential for both performance and safety. Careful preparation can help you avoid mistakes and reduce risks during the process.
Identifying wires and ensuring secure connections are among the most important steps in the installation. Using wiring harnesses helps maintain the integrity of the original wiring and improves reliability. Matching wire colors and functions correctly is critical to avoid damage. Take your time verifying connections – just one mismatched wire can lead to costly repairs.
Insulation and proper routing are just as important as making solid connections. Using soldering or high-quality crimp connectors for secure connections, combined with heat-shrink tubing for insulation, minimizes the risk of short circuits and damage from vibrations. Additionally, routing wires away from heat sources and moving parts ensures the system’s durability over time.
The testing phase is where all your hard work gets validated. By systematically testing functionality, checking voltages, and performing continuity checks, you can confirm that the installation meets safety standards. Load testing under real-world conditions can help identify hidden weaknesses that basic checks might miss. It’s also a good idea to document key test results for future troubleshooting.
Documentation and safety validation are the final steps in completing a professional installation. Ensuring that safety features, like parking brake integration, work as intended protects both the system and the people in the vehicle.
Above all, electrical safety demands attention to detail. If you’re unsure about any part of the process, consult trusted resources or seek help from an expert. A properly installed system will provide years of dependable service, while cutting corners can lead to expensive fixes and safety concerns. Your YeeElek multimedia system is built with quality engineering, and its installation should reflect the same level of care. With these best practices, you’re set to complete your system checks and finalize safety validations.
FAQs
What risks can arise from improper wiring when installing a car multimedia system?
Improper wiring during the installation of a car multimedia system can result in serious risks, such as electrical fires, short circuits, and system malfunctions. These issues don’t just threaten your vehicle’s electrical system – they can also jeopardize the safety of everyone inside the car.
On top of that, faulty or damaged wiring raises the chance of electric shocks and can even permanently harm the multimedia system. To avoid these dangers and ensure the system works as it should, it’s crucial to follow correct wiring procedures, use reliable, high-quality materials, and seek help from a professional installer when necessary.
How can I make sure my wiring connections stay secure and reliable in my car over time?
To ensure your vehicle’s wiring connections stay secure and dependable, start with durable, high-quality materials like sturdy cable ties, clips, and protective sleeves. These help reduce movement and wear over time. It’s also a good idea to routinely inspect the wiring for any signs of damage, corrosion, or wear. If connectors look dirty, clean them thoroughly, and consider applying a small amount of protective grease to keep rust at bay and maintain a solid connection.
Be mindful when securing wires – don’t over-tighten zip ties, as this can damage the insulation. Route wires carefully, keeping them away from heat sources, sharp edges, or moving parts to avoid unnecessary wear or potential hazards. Neatly bundling and securing wires not only looks organized but also minimizes mechanical stress, helping your car’s multimedia system wiring remain safe and reliable for the long haul.
How can I troubleshoot issues with my newly installed car multimedia system?
If your car’s multimedia system isn’t functioning as expected after installation, the first thing to check is the fuse and the wiring connections. Make sure all wires are firmly connected, properly aligned with the correct polarity, and free of any visible damage. Pay particular attention to the ground wire and power supply, as issues in these areas are often the culprits.
If the system still won’t power on, try performing a reset or reboot by holding down the power button for about 5 seconds. This simple step can often clear up minor software glitches. If the problem persists, revisit all the connectors to ensure they’re securely in place. These checks can help address common issues like blown fuses, loose connections, or small software hiccups.
